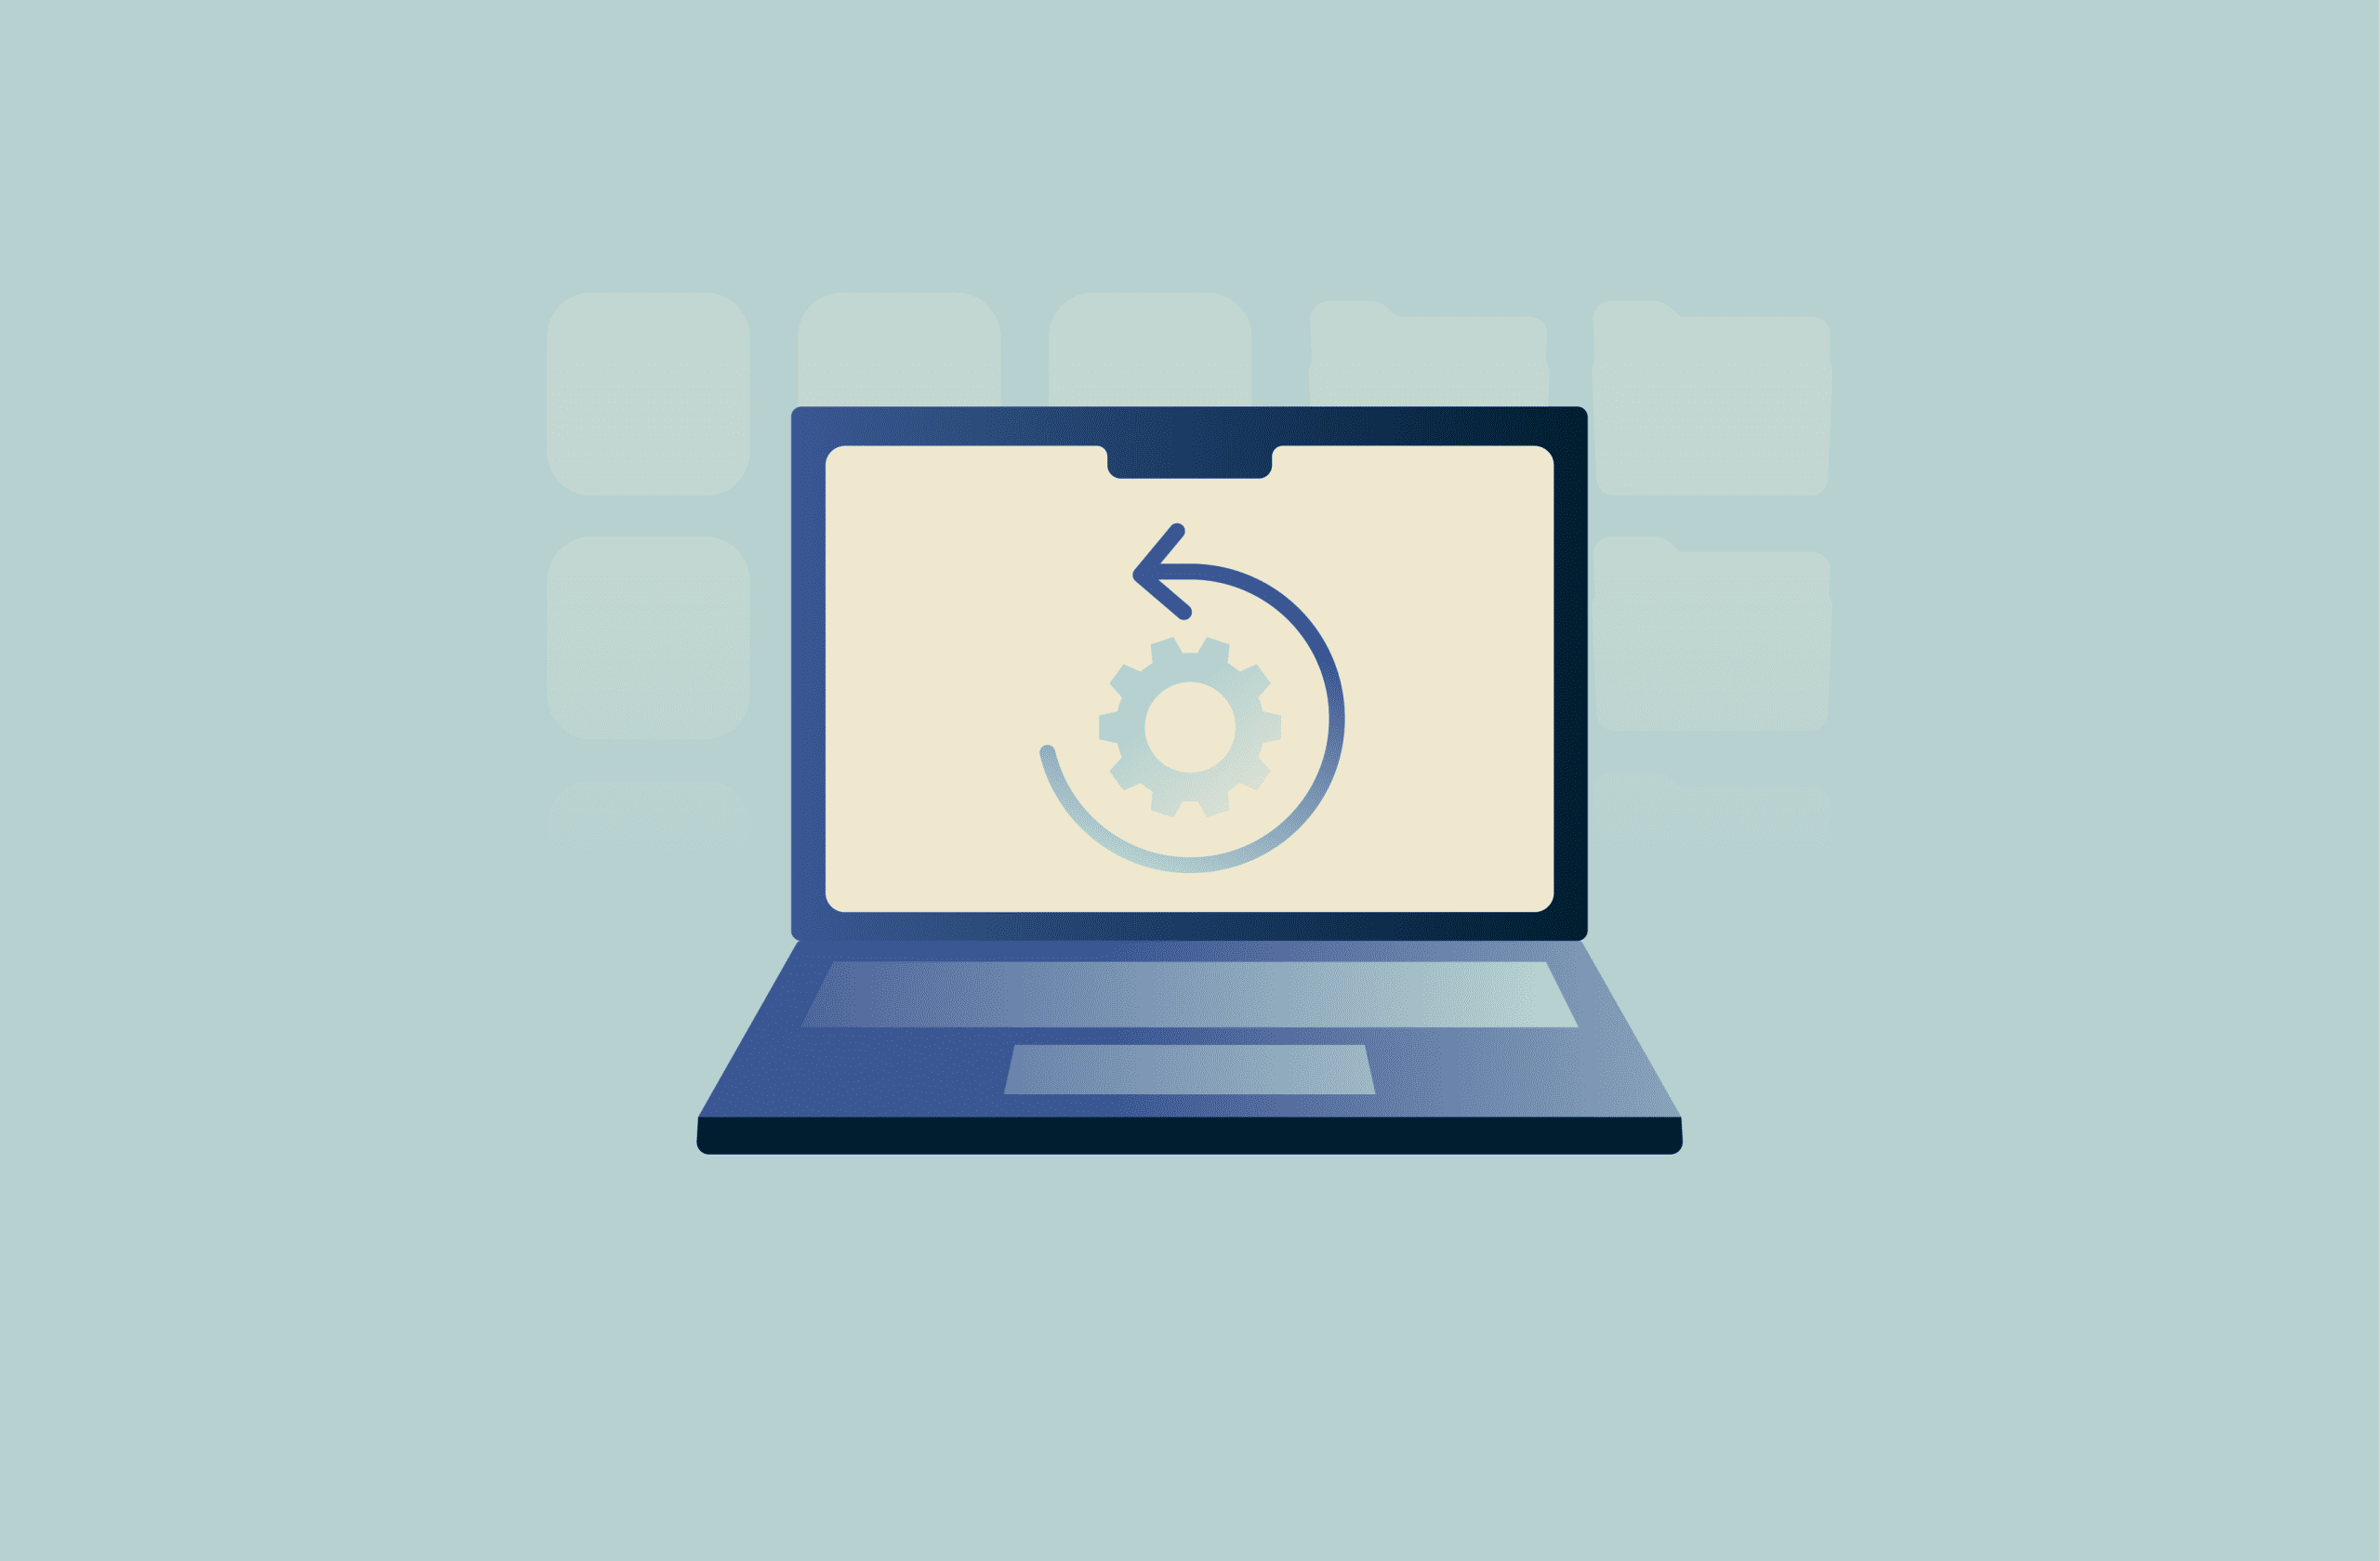
How to reset your MacBook or iMac: A complete step-by-step guide


Resetting a Mac helps you protect your privacy and resolve persistent issues. It's a good idea to reset your device before giving it to a new owner or recycling it, or when software problems continue after basic troubleshooting.
A full reset erases all your data, apps, media, and user accounts and returns the system to its factory settings, and it usually maintains the current operating system (OS).
In this guide, we show you how to get your Mac ready for a reset and securely erase your data.
What to do before you reset your Mac
Before you reset your Mac, you should back up important files and ensure the device is disconnected from your accounts and services.
Back up your data
Time Machine is the simplest option to back up your data because it copies your system settings, apps, and personal files to an external drive.
To back up your Mac with Time Machine:
- Connect an external drive (Apple recommends that this should have at least twice the storage capacity of your Mac), then open System Settings.
- Click General, then Time Machine.
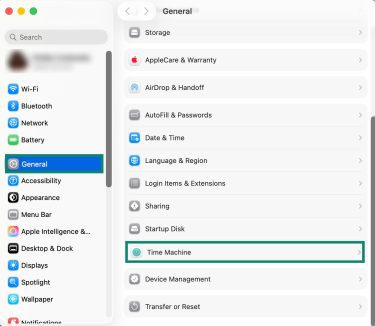
- Click Add Backup Disk, and choose your external drive. If prompted, allow macOS to erase and prepare the drive for backups. Turn on Encrypt Backups if you want extra protection. With this function enabled, you’ll need to create a password that’s required any time you restore files from the backup.
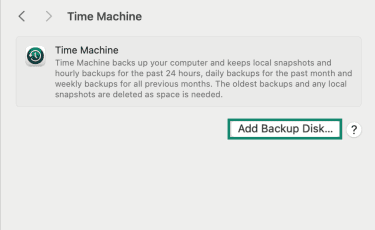
- To begin the backup, go back to the Time Machine menu and click Back Up Now.
If you don’t have an external drive or don’t want to back up everything, you can also manually move individual files or folders to your iCloud Drive in Finder. However, keep in mind that large files may exceed your storage plan.
Unpair connected devices (manual resets only)
Unpair any Bluetooth accessories you plan to keep using, especially if you’re not keeping the Mac. You can do this in System Settings under Bluetooth, where you’ll see a list of paired devices and the option to “Forget this device” for any you no longer want linked to your Mac (note that this is done automatically if you’re using Erase Assistant).
Sign out of Apple services and turn off Find My (manual resets only)
Sign out of your Apple Account (formerly Apple ID) to remove the link between your account and the device. This signs you out of iCloud, iMessage, FaceTime, and the App Store and ensures your account information and data are no longer tied to the Mac once it’s erased.
While signing out, turn off Find My to disconnect the device from Apple’s location services and disable the Activation Lock. Some apps, such as Music or TV, may also require you to deauthorize the Mac for licensing or content access (note this is done automatically if you’re using Erase Assistant).
How to reset your MacBook or iMac
The reset process varies depending on the version of macOS you’re using:
- Erase Assistant: An automated tool available on Monterey (macOS 12) and above, and only on Macs with Apple silicon or the Apple T2 Security Chip (models released from 2018 onward).
- Manual reset: Required for older Macs or Macs running Big Sur (macOS 11) and earlier.
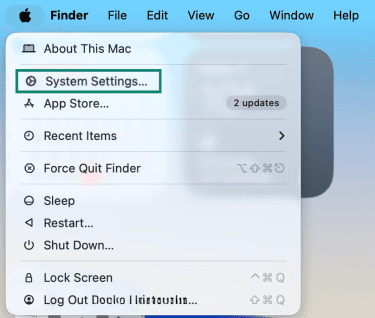
Follow the steps that match your Mac’s OS. You can check your macOS version and chip details by going to the Apple menu and selecting “About This Mac.”
Using Erase Assistant (macOS Monterey and later)
Erase Assistant removes your data, apps, and settings, signs you out of Apple services, and prepares the Mac for setup again while maintaining the current OS.
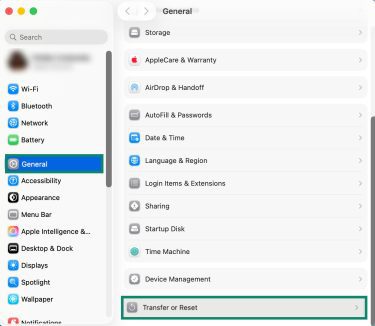
- In System Settings, click General and then Transfer or Reset.
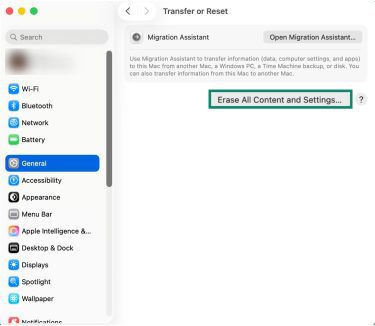
- Select Erase All Content and Settings.
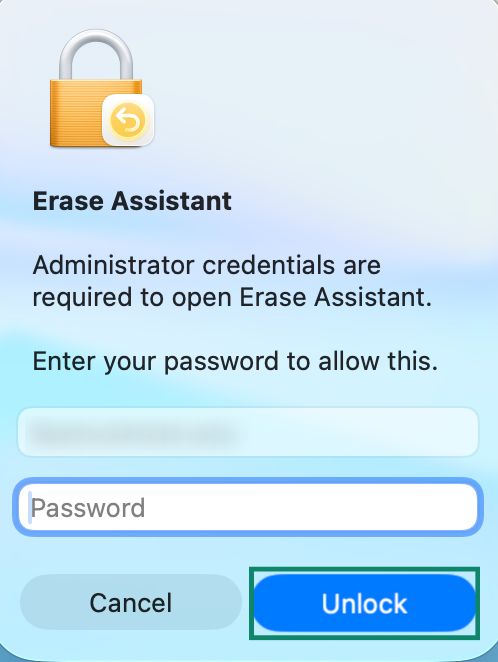
- Enter your admin password (or Touch ID) and click Unlock.
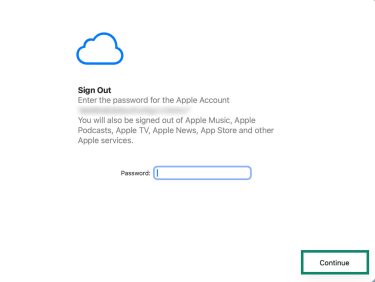
- Sign out of your Apple Account and click Continue.
- Erase Assistant shows a summary of what will be removed during the reset. Review the list and click Continue to proceed.

- Allow your Mac to erase and restart.
After rebooting, the setup assistant will appear. If you want to use your Mac again, set it up by following the on-screen instructions. If you’re getting rid of the Mac, ignore the setup assistant and press and hold the power button to shut it down.
Manual reset (macOS Big Sur and earlier)
For macOS systems running Big Sur and earlier, or Macs without Apple silicon or the T2 security chip, the reset process must be done manually through Recovery Mode and Disk Utility.
Follow the steps below to manually reset your Mac:
- Shut down your Mac.
- Turn it back on and immediately hold Command (⌘) + R until the Recovery menu appears.
- Select Disk Utility and choose Continue.
- Select your startup disk, which will be named Macintosh HD unless you previously renamed it.
- Note: If you don’t see “Macintosh HD” or the expected startup disk listed, shut down your Mac and disconnect any nonessential external devices, then open Disk Utility again. If the disk still doesn’t appear or the erase process fails, your Mac may require a service.
- Choose a name and the appropriate format, then click Erase or Erase Volume Group. Disk Utility will show the recommended format for your system, usually Apple File System (APFS) or Mac OS Extended (Journaled).
- When the erase finishes, close Disk Utility to return to the Recovery menu.
- Select Reinstall macOS from the Recovery menu and follow the prompts.
After installation, your Mac will restart and display the setup assistant. If you’re not planning to use the Mac again, ignore the assistant and shut it down. If you plan to continue using the device, follow the steps on screen to complete the initial setup.
Extra tips for a complete reset
If you want your Mac in the cleanest possible state, whether for sale or to rule out lingering issues, these final steps can help you do that.
Resetting NVRAM and SMC
Non-volatile random-access memory (NVRAM) and the System Management Controller (SMC) store basic settings your Mac uses when starting up. These include display preferences, sound volume, power behavior, and which disk to start from. Resetting them can help clear hardware quirks that remain after reinstalling macOS.
Macs with Apple silicon
No manual resets are required. These models reset NVRAM and SMC-related functions automatically each time you shut down and restart the Mac.
Macs with an Intel processor
If your Mac runs on an Intel processor (models released before 2020) and you want to reset NVRAM or the SMC, you’ll need to do so manually.
How to reset NVRAM (all Intel-based Macs)
- Shut down your Mac.
- Turn it back on and immediately press and hold Option + Command (⌘) + P + R.
- Hold the keys for about 20 seconds, then release them.
How to reset the SMC
Resetting the SMC varies depending on your device type (MacBook or iMac) and which chip it’s using.
For MacBooks with the Apple T2 security chip:
- Shut down your Mac.
- Press and hold Control + Option (Alt) + Shift for 7 seconds.
- Keep holding those keys, then press and hold the power (or Touch ID) button.
- Hold all four keys for another 7 seconds, then release.
- Wait a moment, then turn your Mac back on.
For MacBooks without a T2 chip:
- Shut down your Mac.
- Press and hold Shift + Control + Option (Alt) + the power button for 10 seconds.
- Release all keys, wait a moment, then turn your Mac back on.
For iMacs:
- Shut down your Mac and unplug the power cord.
- Wait 15 seconds, then plug it back in.
- Wait 5 seconds, then turn your Mac on.
Ensuring your old data can’t be recovered
If you’re selling, trading in, or giving away your Mac, you may want extra reassurance that your old data can’t be recovered.
For most modern Macs with solid state drives (SSDs)
Macs with solid-state storage use built-in encryption. When you erase an SSD in Disk Utility, the system removes the keys that allowed the data to be read. Without those keys, any leftover information on the disk is unreadable.
A standard erase is already secure on devices with this type of storage, which is why additional “secure erase” options aren’t shown for these Macs.
For older Macs with mechanical hard disk drives (HDDs)
These drives store data differently and can sometimes be partially recovered after being erased. If your Mac has an HDD, you can choose a more thorough erase method.
- In Recovery Mode, open Disk Utility.
- Select your drive and click the Erase icon.
- If available, select Security Options.
- Move the slider to choose how many times you want to write over the erased data, then click OK. This process can take many hours on larger disks.
What to expect after a factory reset
When the reset finishes and macOS reinstalls, your Mac restarts on its own and shows the multilingual “Hello” screen just like a brand-new device.
The setup assistant walks you through the first steps to getting the Mac up and running again, if you wish to continue using it. If you want to leave the Mac in an out-of-box state, simply ignore the setup assistant and power down your Mac.
If setting up the Mac for use, you can complete most settings later, but a few screens appear right away:
- Basic setup and activation: You’ll choose your region, language, and keyboard layout. You’ll also be able to connect to Wi-Fi or plug in an Ethernet cable. Your Mac will activate by checking in with Apple’s servers. If Activation Lock isn’t enabled, activation completes automatically.
- Migration Assistant: Here you choose whether to restore your backed-up data or set up the Mac as new.
- If the Mac is for a new owner or you want a clean system: Select the option to set it up without transferring data.
- If you want your files back: Choose the option to restore from a Time Machine backup or another Mac. Connect your backup drive and follow the steps on-screen.
- Signing in: You can sign in with your Apple Account to set up iCloud, the App Store, and Messages. If you’re preparing the Mac for someone else, skip this step.
You can also review our guide to MacBook security for steps that help you keep the system protected after setting it up.
Common post-reset issues
You might see a few unexpected prompts after a reset. These are the most frequent ones and how to handle them.
Activation lock appears
If the setup stops and asks for linked Apple Account credentials, Activation Lock is still enabled. This happens when Find My was enabled before a manual reset. Only the person who originally set up the Mac can remove it by signing into their iCloud account.
There’s no way to complete the setup until the device is removed from that account, but the owner can do the reset remotely by signing in to iCloud.com, selecting the Mac in Find Devices, and removing it from their account. Once that’s done, setup can continue normally.
An older version of macOS is installed
Some Intel-based Macs reinstall the version of macOS they originally came with when using certain recovery methods. If you want to update to the latest OS, you can do so after completing the setup. Open System Settings (or System Preferences), go to General, and select Software Updates to install the latest version your Mac supports.
FAQ: Common questions about how to reset a MacBook
How can I reset a MacBook without the password?
You may be able to reset a MacBook without your admin password by using Recovery Mode. From there, you can erase the startup disk in Disk Utility and reinstall macOS. However, this method may not bypass an Activation Lock if one has been enabled, and you may still need your Apple Account credentials. If Recovery Mode doesn’t work and you’ve lost access to all your credentials, it’s best to contact Apple support.
Will factory resetting delete everything on my Mac?
Yes. A factory reset removes all files, apps, accounts, and settings from your startup disk. After the reset, the Mac starts with a clean installation of macOS and no personal data.
Can resetting fix performance issues?
It can, in some cases. If your Mac is slowed down by corrupted files, software conflicts, or settings problems, a reset installs a fresh copy of macOS that may improve stability and performance.
How long does a Mac reset take?
The duration varies. Erasing the disk is usually quick (especially if you’re using Erase Assistant), but reinstalling macOS can take some time because the system needs to redownload the software. The exact duration depends on your device and internet connection, but note that it can vary from a few minutes to a few hours.
Take the first step to protect yourself online. Try ExpressVPN risk-free.
Get ExpressVPN